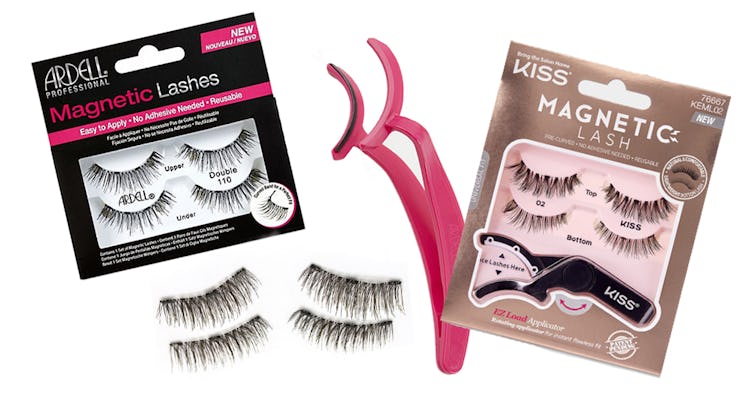
How To Apply Magnetic Eyelashes & Achieve The Strong Lash Game You've Always Dreamed Of
Out of all the eye-catching innovations in beauty, magnetic falsies are without a doubt some of the most fascinating — and TBH, some of the most confusing, too. How to apply magnetic eyelashes is a question asked by many, especially those who aren't exactly pros in the false lash department, but still want a luscious look without shelling out hard-earned coin for lash extensions. Fortunately, the Internet is a place of learning (amongst other things), and I've rounded up the best videos, tips, and products to perfect your magnetic eyelash application once and for all.
Now, personally, I am somewhat of a pro in the falsies field, if I do say so myself. I wear false lashes almost every single day, but even I admit that the application process for magnetic lashes really threw me for a loop at first. They seemed appealing, but also terrifying, and I didn't want to screw up the few natural lashes I have left. After a little research and a lot of practice, though, I was able to make the most of some thorough Instagram tutorial videos and determine the exact steps required to mastering the magnetic lash once and for all.
Pick The Right Pair
You can't start the process without the lashes themselves, right? There are tons of magnetic lashes on the market these days, and all the top drugstore brands offer high-quality kits that won't break the bank. I typically reach for Ardell lashes because I favor their lightweight, thin bands and wispy styles, and the Ardell Magnetic Lash #110 ($14, ulta.com) is a great starter pair for anyone hoping to practice and perfect their magnetic lash game.
Use The Right Tools
I've always been someone that applied my lashes with a tweezer, but after watching videos of people doing the same with their magnetic lashes, I started to second-guess my method. Magnets, sharp objects, my tendency to flinch...it began to seem like a recipe for disaster. Before you even get started with the application process, pick up an applicator tool designed specifically for magnetic lashes. All sets of Kiss Magnetic Strip Lashes ($12, walmart.com) come with a a super easy to use, unique lash applicator that places both layers of the lash in the perfect spot to stick them on effortlessly. Seriously, it's a huge game-changer. If you're partial to the Ardell lashes, they sell their Magnetic Lash Applicator ($2, ulta.com) separately from their lash sets.
See how the whole tweezer thing can look downright dangerous? I'm trying to avoid any and all risk of poking my eye, thank u, next:
Line Everything Up
Now that you've got your lashes and applicator, you can really get started. While you might've thought you were getting two sets of lashes in that kit you purchased, look again — one set of magnetic lashes involves four strips total, two uppers and two lowers. Before even touching your eyes, you want to take the strips for one eye and attach them to the magnets on your lash applicator. The Ardell applicator is more simplistic, and you simply place them on and you're good to go. The KISS applicator has a rotating hinge that makes placing the lashes even easier, as it then snaps into place so they're perfectly parallel. When you're placing the lashes on either applicator, make sure both are curving upward.
This video shows exactly how to prep the KISS applicator:
Apply Some Mascara
You don't want to pull at the magnets with a mascara wand once they're on your eyes, so you want to make sure your mascara is perfectly applied before you slap on a lash. Any mascara will do, but I always opt for a curling mascara to ensure my straight lashes blend seemlessly with my curly falsies. The Benefit Cosmetics Roller Lash Curling & Lifting Mascara ($25, ulta.com) is a great choice if you, too, struggle with eyelashes that hardly hold a curl.
Just Do It
Okay, the time has come, and we're ready to apply. Don't freak out, don't overthink it! You can always adjust, and since magnetic lashes don't involve the messy lash glue struggle, you can try again and again until you get it right. Practice makes perfect, after all! Simply use the tool to allign the upper and lower lash strips with your upper lashline, and clamp your applicator (think of the way you'd press down and clamp an eyelash curler) to secure the false lashes to your own. The magnets on the strips are stronger than the ones on the applicator holding them in place, so they should come together with ease. If you didn't nail it and can't shift them into place, feel free to remove the lashes and try again. Repeat on the other eye.
Here's another application video, in case you're a visual learner like me:
Be honest: that wasn't as bad as you thought it'd be, right? I mean, half the steps were just to go shopping! Then it's just prepping your applicator, swiping on mascara, and clamping down to apply. Easy as one, two, three! That's not to say it might not take a few tries to get the hang of it, but I have faith in you and your magnetic lash game, and as long as you follow these steps, I promise it won't be long until others start asking if you finally got lash extensions. Your secret is safe with me.