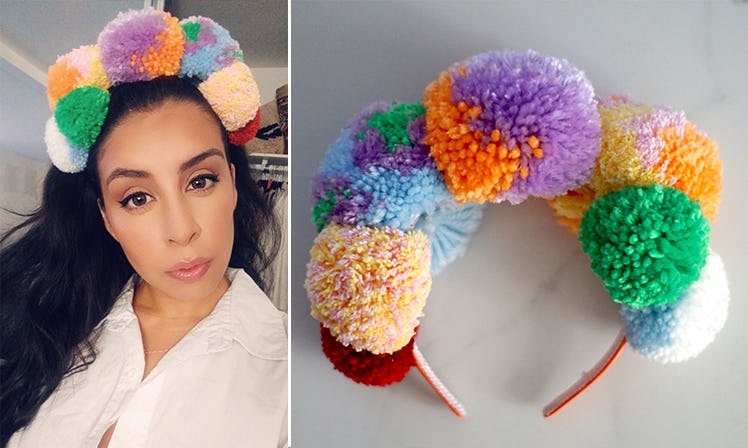
I Was So Inspired By Beyoncé's 'Vogue' Cover, I DIYed My Own Statement Headpiece
You'd have to be living under a rock to not have heard or seen the gorgeousity that is Beyoncé's Vogue spread, in which she rocks a variety of headpieces, minimal makeup, and a dress from pre-spring 2019 (aka the future). After witnessing the stunning images of Queen Bey myself, Beyonce’s Vogue headpiece inspired me to channel my own inner diva via a colorful, summer-ready headpiece. But how on earth was I going to procure such a statement-making accessory? Like a true millennial, I decided to hit up Instagram.
I searched all over for the ideal on-trend headpiece to tap into my Sasha Fierce and came across a cute pom-pom-adorned headband. I couldn’t decide whether it was actually wearable, or if it just seemed understated in comparison to the ones worn by Beyoncé, so I figured it was perfect. The only way I could describe it is like this: It’s a colorful cluster of multicolored pom-poms that feel like a cooler, less played-out version of a flower crown (where was this when I was shopping for Coachella?). The only problem is it’s the prize in a giveaway — it’s not actually for sale. The description in the caption says it’s a “handmade, one-of-a-kind piece,” so I figure, if someone else could make that headband, so can I. After swiping through the photos and carefully studying every color, size, and placement of each pom-pom, I make a craft-store run and buy everything I need to make my own.
I bought a ton of yarn colors to make my pom-poms (Kelly green, light pink, light blue, yellow, lavender, white, orange, and red). The only thing is yarn comes in huge spools and I only need a little bit, so I guess my friends are getting headbands for their birthdays. The good news is they only cost a couple dollars each. Next, I buy a plain band — any one works, but I opt for a satin one in a bright color. And lastly, you need scissors and a hot glue gun.
First, I make the pom-poms. If you’ve never made them before, they’re super easy to make — however, they are time-consuming. After you make your first one, you’re going to want to put pom-poms on everything. Pick your thread color(s) and begin wrapping them around a base. You can use a cardboard cutout, a tiny box, anything — just keep in mind that the bigger the base, the bigger your pom-pom.
Continue wrapping until you have enough to fill an entire ball, and when in doubt, use more yarn than you think. Then, slide your yard off the base and tie an extra piece of yarn around the center to secure. Next, cut all the loops on both sides to create loose ends, and finally, trim the excess to create a perfectly round pom-pom.
The photo of my inspiration shows different kinds of pom-poms. Some are a solid shade, while others have patches of different colors, and there’s even some with different yarns evenly dispersed. To split two colors in half, wrap one half of your base with one color, and the other half with another. To get an even mix, wrap two yarns at the same time. To get patches of color, wrap as many colors as you’d like in your pom-pom around your base in a random order.
After you’ve made all your pom-poms, hold them up against your head for size and trim as needed. They might not look that big until they’re sitting on your head. Next, plan your layout buy laying them down along the top of your headband. Once you’ve planned your composition, glue them down using your hot glue gun. And voilá, you’ve got yourself a headband!
OK, so here’s a little FYI for you: This headband took me all day to make, and I got a blister from holding my scissors, but in the end, I was super happy with how it turned out. This is one of those weekend, Netflix-binging projects — make yourself some pom-poms as you catch up on your favorite show. Another thing is trimming all your pom-poms will get kind of messy. I did this on the floor so I could just vacuum my rug when I was done — though I did still find excess fluff on my dog the next day.
I’m obsessed with the final product — it’s cute, different, and such an eye catcher. I can’t wait to get some wind in my hair and strut down the street with my Bey attitude. And the best part is I made it myself for under $20 — mostly because what I don’t have is that Beyoncé budget.